
Disclaimer
This blog is my personal platform. The opinions shared here are solely mine and do not reflect the views of any individuals, institutions, or organisations with which I am affiliated, unless explicitly noted. I am solely responsible for the content presented here.

Introduction
Welcome back to my Passwordless Authentication series! In Part 1, we explored the basics of passwordless authentication and why it’s becoming essential for modern security. Today, in Part 2, we're diving deeper talking about some best practices for Microsoft 365 tenants, Microsoft's recent decision to begin enforcing mandatory multifactor authentication (MFA) for the Microsoft Azure portal, the Microsoft Entra admin centre, and the Microsoft Intune admin centre, and by demonstrating how to enable passkeys in your Microsoft 365 tenant and how to register and log in using a FIDO2 security key.
You might be wondering why I chose to delve into passwordless authentication methods. Several key reasons prompted this focus:
Personal interest: My curiosity about the subject drove me to explore it in greater detail.
Personal experience with data breaches: Having been a victim of data breaches and compromises—both due to my mistakes and because I trusted a third party to safeguard my data—I wanted to educate myself and others on the importance of multi-factor authentication (MFA) and passwordless methods.
Rising threats: Data breaches continue to rise, man-in-the-middle attacks are becoming increasingly common, and the shift to remote work has introduced additional risks and opportunities for token theft.
Password fatigue: Let’s be honest, who isn’t tired of managing passwords?
Recent Microsoft announcements: Microsoft has recently begun enforcing MFA for Azure sign-ins, making this topic more relevant than ever.
Let's dive right in!
Table of contents
Best Practices for Microsoft 365 Tenants
As many of you know, it’s considered best practice to maintain a clear separation between administrative and standard user accounts. This means that administrative accounts—used for tasks like accessing admin portals through the GUI or PowerShell—should be cloud-only accounts, not synchronised from on-premises environments. This reduces the risk of lateral movement in case either your on-premises or cloud environment is compromised. It should come as no surprise that MFA will now be required for admin accounts to access the Azure portal and the Microsoft Entra and Microsoft Intune admin centres.
However, what might catch some off guard is that, as things stand, Microsoft does not appear to be allowing exceptions to this MFA requirement for Azure portal sign-ins. This brings us to the topic of break-glass, or emergency access, accounts.
2. Understanding Emergency Access Accounts
It’s crucial to prevent accidental lockouts from your Microsoft Entra organisation, especially if you can’t sign in or activate another user's account as an administrator. To mitigate the risk of losing administrative access, organisations should create two or more emergency access accounts.
These accounts hold high-level privileges and are not assigned to specific individuals. Their use is reserved for emergency scenarios where normal administrative accounts are unavailable. The goal should be to restrict the use of these accounts to absolute necessity.
2.1. Why You Need an Emergency Access Account
Your organisation might require an emergency access account in situations such as:
Administrators unable to complete MFA due to network outages or unavailable devices.
Loss of Global Administrator access due to staff changes.
A failure in federated services preventing user sign-ins.
Unforeseen events impacting network availability.
2.2. Best Practices for Configuring Emergency Access Accounts
Emergency access accounts should be independent of any specific individual within your organisation. These accounts should not be linked to employee-owned devices, personal tokens, or any individual-specific credentials (including biometrics). This separation ensures that access is available even if a key employee is unavailable. Store all associated devices in a secure, accessible location with clear communication channels to Microsoft Entra ID.
Store the credentials for emergency access accounts securely, limiting access to authorised individuals only. Consider using smartcards, FIDO2 security keys, or strong passwords. The passwords for these accounts should be very long, (Microsoft recommends 16 characters or more but I would go much longer), and randomly generated. Some organisations take additional precautions by splitting the password into two parts—keeping one half in written on a piece of paper in a secure safe at the organisation’s headquarters for example, and storing the other half in a password manager or another secure location. This practice adds an extra layer of security, ensuring that the full password is never easily accessible in a single location.
Implement strong and distinct authentication methods for emergency access accounts. For instance, if your regular administrative accounts use the Microsoft Authenticator app, consider FIDO2 security keys for break glass accounts. This reduces the risk of dependency on the same authentication methods and prevents external vulnerabilities in your authentication process.
Ensure that the devices or credentials associated with emergency accounts do not expire and are not subject to automated cleanups due to inactivity. This practice guarantees that the accounts remain accessible whenever needed.
Exclude emergency access accounts from conditional access policies: During emergencies, it’s critical to have uninterrupted access. Ensure that at least one emergency access account is exempt from all Conditional Access policies to avoid any restrictions when addressing urgent issues.
Assign the Global Administrator role permanently to emergency access accounts (even when you’re using Microsoft Entra Privileged Identity Management, avoid making these roles eligible, as permanent assignments reduce complexity during emergencies).
For organisations using Active Directory Domain Services (AD DS), Active Directory Federation Services (AD FS), or similar identity providers, keep emergency access for on-premises and cloud services separate. Ensure that these systems are independent and not reliant on each other to avoid unnecessary risks during system outages.
Regularly monitor sign-in and audit logs for emergency access accounts to track their usage. This ensures that these accounts are only accessed during testing or real emergencies. Use tools like Azure Log Analytics to trigger alerts to administrators whenever these accounts are accessed.
Conduct periodic validation and training to ensure emergency access accounts are functional and ready for use. Key steps include:
Notify security teams: Inform your security team when validation activities are being conducted.
Training: Train administrators and security officers on the use of these accounts.
Document Procedures: Keep the "break glass" process well-documented and up-to-date.
Verify MFA and SSPR registration: Ensure MFA or self-service password reset (SSPR) isn’t tied to any individual’s personal device or information.
Update credentials: Regularly update and test credentials, ensuring accounts can perform necessary tasks.
Check device accessibility: Confirm that any linked devices are accessible and can connect via multiple, independent network paths.
Perform these validations every 90 days or during significant organisational changes, such as staff transitions or changes to your Microsoft Entra subscriptions.
Reference: https://learn.microsoft.com/en-us/entra/identity/role-based-access-control/security-emergency-access
3. MFA and Azure Sign-Ins: What’s Next?
Starting October 2024, Azure will begin enforcing MFA for all users signing into the Azure portal, with a phased rollout extending to CLI, PowerShell, and IaC tools by early 2025. In October 2024, Microsoft will also begin enforcing mandatory multifactor authentication (MFA) for the the Microsoft Entra admin center, and the Microsoft Intune admin centers. This enforcement ensures that all administrative actions are protected by MFA, reinforcing the security of your cloud environment.
Microsoft will notify global admins of enforcement dates well in advance, and a grace period may be provided for organisations needing additional time to comply.
3.1. Scope and Impact
This MFA requirement applies to all users signing into the Azure portal or using tools like Azure CLI and PowerShell. However, workload identities, such as managed identities and service principals, will not be affected.
3.2. Preparing for MFA Enforcement
To prepare, organisations should begin setting up MFA for all relevant accounts. For those using user identities for automation, transitioning to managed identities or service principals is advisable.
Reference:
4. Enable passkeys in your tenant
Here are step-by-step instructions for enabling passkeys in Entra ID and setting up FIDO2 security keys, followed by the FIDO2 login process:
Enabling Passkeys in Entra ID
Navigate to the Entra ID Portal:
Go to the Entra ID portal and sign in with your admin credentials.
Once signed in, navigate to Protection > Authentication methods.

2. Enable Passkeys:
In the Authentication Methods section, click on Passkeys (DO2).
Toggle the Enable button to On.
Modify the Include and Exclude lists as necessary for your organisation. You can scope the feature to all users or select specific groups.

3. Configure Passkey Settings:
Go to the Configure tab within the same menu.
Modify the settings listed there according to your organisation’s security requirements.

Allow self-service setup should be set to Yes. If set to No, users cannot register a passkey through MySecurityInfo (https://mysignins.microsoft.com/security-info), even if enabled by the Authentication Methods policy.
Enforce attestation should be set to Yes if your organisation requires assurance that a FIDO2 security key model or passkey provider is genuine and from a legitimate vendor.
For FIDO2 security keys, the key metadata must be published and verified with the FIDO Alliance Metadata Service and pass additional validation tests by Microsoft.
Notes:
· Attestation is not currently supported for passkeys in Microsoft Authenticator.
· Attestation enforcement applies only during passkey registration. If you later enable attestation enforcement, users who registered without attestation will not be blocked from signing in.
Enforce key restrictions should be enabled only if your organisation wants to allow or disallow specific security key models or passkey providers, identified by their Authenticator Attestation GUID (AAGUID). Work with your security key vendor to determine the AAGUID, or view the authentication method details for a registered passkey.
When key restrictions are enabled, you can select Microsoft Authenticator (preview) if the option is available in the admin centre. This will automatically add the Authenticator app AAGUIDs to the key restriction list. Otherwise, manually add the following AAGUIDs to enable the Authenticator passkey preview:
*Authenticator for iOS: 90a3ccdf-635c-4729-a248-9b709135078f
*Authenticator for Android: de1e552d-db1d-4423-a619-566b625cdc84
Note: Key restrictions affect the usability of specific models or providers for both registration and authentication. If you remove an AAGUID that was previously allowed, users will no longer be able to sign in with that method.
Passkey Authenticator Attestation GUID (AAGUID)
The FIDO2 specification requires security key vendors to provide an AAGUID during registration. This 128-bit identifier specifies the key type, such as make and model. Passkey providers on desktop and mobile devices also need to provide an AAGUID during registration.
Note: Vendors must ensure that the AAGUID is consistent across all similar security keys or passkey providers made by them, and that it differs significantly from the AAGUIDs of other key types or providers. The AAGUID for a given model should be randomly generated to ensure uniqueness.
To obtain an AAGUID, either contact your security key or passkey vendor or check the authentication method details for the specific key used by a user.
4. Save Changes:
Once all configurations are done, make sure to save your changes.
Now, your users will have the ability to set up passkeys, including FIDO2 security keys.
Notes:
· If you encounter an error when saving, it may be due to the number of users or groups being added. To resolve this, try replacing the users or groups with a single group and save again.
· I also came across an issue where I received an error while saving the passkeys' authentication methods policy. To resolve it, I had to temporarily disable the Self-Service Password Reset options, and re-enable them after successfully saving the policy.
5. Setting Up Passkeys (FIDO) in Microsoft 365
5.1. Requirements
Microsoft Entra Multi-Factor Authentication (MFA) is required.
FIDO2 security keys that are eligible for attestation with Microsoft Entra ID or Microsoft Authenticator.
Devices that support passkey (FIDO2) authentication. For optimal performance on Windows devices joined to Microsoft Entra ID, use Windows 10 version 1903 or later. Hybrid-joined devices should run Windows 10 version 2004 or later.
Passkeys are supported across major platforms, including Windows, macOS, Android, and iOS.
5.2. Setting Up FIDO2 Security Keys (End-User Instructions)
Sign in to the Security Info Page:
Go to https://mysignins.microsoft.com/security-info and sign in with your credentials.
Add a Sign-In Method:
On the Security Info page, click on Add sign-in method.

3. Select Security Key:
From the drop-down menu that appears, select Security key and click Add.


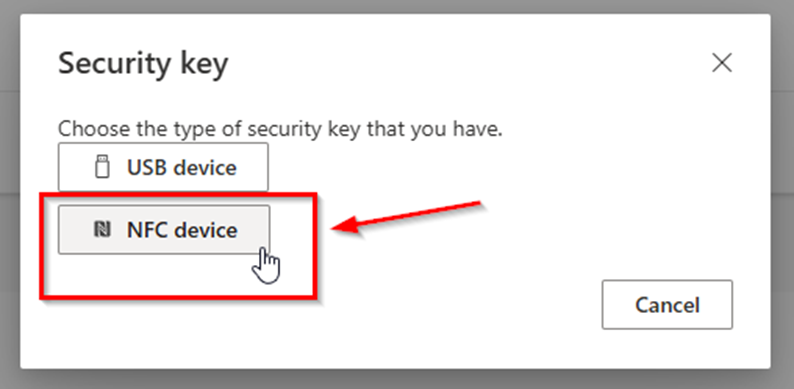
4. Choose Key Type:
Choose whether your key is a USB or an NFC type.

If your key has NFC capability, you may want to set it up as the NFC type to utilise this feature.
5. Follow the Prompts:
Follow the on-screen instructions, making sure your security key is ready.
You’ll be asked where you want to store your passkey. For physical FIDO2 keys, choose Security key and click Next.

*

*

*

*

*

6. Insert Your Security Key:
When prompted, insert your security key into the USB port.

7. Set Up Your Security PIN:
You’ll be asked to set up a PIN for your security key. Ensure that this PIN is strong and memorable, as it will be required for every sign-in.
Avoid simple PINs like "0000" or "1234".

8. Touch or Activate Your Key:
Depending on your key’s functionality, you may need to touch it, press a button, or scan your fingerprint.

9. Save Your Passkey:
After successfully completing the actions, your passkey will be saved.

10. Name Your Security Key:
Enter a name for your security key so you can easily distinguish it from other keys or authentication methods.

*

11. Complete the Setup:
After naming your key, click Next and then Done.

12. You are now ready to use your security key for sign-ins.

5.3. FIDO2 Login Process
Navigate to a Portal:
Go to any Microsoft portal, such as an Admin Center, office.com, or outlook.com, etc.
Enter Your Email Address:
Type in your email address and click Next.
Choose Authentication Method:
You will be given an option to either enter your password or choose “Use your face, fingerprint, PIN, or security key instead.” Click on that option.

4. Select Security Key:
For hardware FIDO2, select Security key and click Next.

5. Insert Your Security Key:
Insert your security key into the USB port.

6. Enter Your PIN:
Type in the PIN you set up during the FIDO2 registration process.

7. Touch or Activate Your Key:
You will then be asked to touch your key or perform the necessary action (e.g., pressing a button or scanning biometrics).

8. Complete the Sign-In:
Once successfully authenticated, you will be signed into the portal or service.
6. Important note about passwordless authentication
Passwordless authentication, including methods like passkeys, FIDO2 security keys, or biometric authentication, significantly reduces the risks associated with traditional passwords, such as phishing and brute-force attacks. However, while passwordless authentication is much more secure, it is not entirely immune to potential security threats.
6.1.Potential Risks of Token Theft in Passwordless Authentication
Token Hijacking During Transmission:
If the authentication token (which is a temporary credential used to prove the user's identity) is not properly protected during transmission (e.g., over an insecure network), a bad actor could intercept it.
Mitigation: Secure protocols like HTTPS are typically used to encrypt data in transit, making token hijacking extremely difficult.
Malware and Keyloggers:
A compromised device with malware or keyloggers could capture authentication tokens or session data.
Mitigation: Use of strong endpoint security, regular software updates, and anti-malware solutions can reduce this risk.
Man-in-the-Middle (MitM) Attacks:
In a MitM attack, a bad actor intercepts communication between the user and the service, potentially stealing tokens if they are not securely transmitted.
Mitigation: Mutual TLS (Transport Layer Security), DNSSEC, and strong encryption help protect against MitM attacks.
Phishing for Token Codes:
Although passwordless methods are resistant to traditional phishing, a sophisticated phishing attempt could trick a user into divulging a one-time token or security code.
Mitigation: Educating users about phishing and employing additional security measures like device attestation and anti-phishing software can help.
Session Hijacking:
After authentication, a bad actor could potentially steal a session token stored in a browser or application, especially if the session is not properly secured.
Mitigation: Secure session management practices, such as short session lifetimes and requiring re-authentication for sensitive actions, can prevent session hijacking.
6.2. Why Passwordless Authentication is Safer:
Reduced Exposure: Since there are no passwords to steal, the attack surface is significantly reduced. Passwordless systems typically rely on public-key cryptography, where the private key never leaves the user's device, making it harder for attackers to access.
Biometric Protections: If biometrics (e.g., fingerprint or facial recognition) are used, the biometric data is usually stored securely on the device (in a trusted platform module or secure enclave), and cannot be easily extracted or reused by an attacker.
Device-Based Security: Passwordless methods often require physical possession of a device, like a security key, which adds a layer of security that an attacker would find difficult to bypass remotely.
7. Conclusion
While passwordless authentication greatly improves security and reduces the risk of token theft, it is not completely immune to attacks. However, with proper security measures in place, such as encrypted communication channels, secure session management, and user education, the risk can be minimised to a very low level. This makes passwordless authentication a highly secure method for modern identity management.
Let me know what you think and stay tuned for the next post where we'll dive deeper into enhancing your security with advanced authentication methods.
Comments